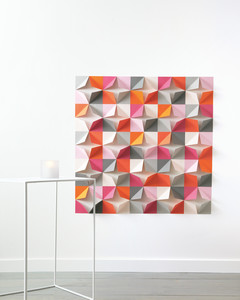
If you can cut and fold paper, then you can turn any blank space at your reception or ceremony site into a Pop Art showpiece.
Tools and Materials
Scissors
8 1/2-by-11-inch Paper Presentation matte cover-weight letter paper (paperpresentation.com)
Metal ruler
Pencil
Craft knife
Cutting surface
Foam board (optional)
Removable painters' tape
Folded-Paper Wall Backdrop How-To
- Cut 3 inches off of the long side of each of 25 sheets of paper.
- Using your ruler, mark the center point of each of the four sides of one sheet of paper (at 5 1/2 inches). Draw a line connecting the marks on opposite sides of the paper so it is divided into four equal squares. Cut along the lines with a craft knife. Repeat for the remaining 24 sheets.
- Fold each square in half diagonally, pressing opposite corners together.
- Create a grid on a piece of foam board or directly on the wall you are applying the decoration to. Using a pencil, lightly mark a square that is 4 1/2 feet on each side. Make a mark along the edges every 5 1/2 inches, then connect the marks on opposite sides to create 25 boxes.
- Play around with the colors and design by sticking one half of each folded paper square to the wall with removable painters' tape. Once you've decided on a pattern, repeat that all over the wall.
Original article and pictures take www.marthastewartweddings.com site
Комментариев нет:
Отправить комментарий